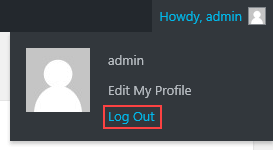
In a default WordPress installation, the only place the logout link is displayed is the WordPress admin bar. If your WordPress site is designed primarily for registered users, it can be helpful to add a logout link to the navigation menu.
WordPress admin bar-Log out
Adding a logout link to a navigation menu
One of the best places to add a logout link is in your siteˇŻs navigation menu. Adding the link here will make it easily accessible on every page of your site.
Firstly, log in to your WordPress dashboard and go to?Appearance?>?Menus.
Adding a logout link to a navigation menu
Then, Expand the Custom Links section and add the logout URL in the?URL?field, making sure to change?example.com?to your domain name and change the path to your WordPress installation folder, if necessary.
Secondly, In?Link Text, add the text you want to be displayed in the menu. In our example, the text is?Log Out. Click?Add to Menu.
Link Text
After that, you should now see the?Log Out?link in the Menu Structure. If you want to change the order of the menu links, drag the links to the correct position. When youˇŻre happy with the menu links, click?Save Menu.
Logout link in the Menu Structure
You should now see the?Log Out?link on your siteˇŻs navigation menu.
Log Out?link on siteˇŻs navigation menu.
Adding a logout link to the sidebar
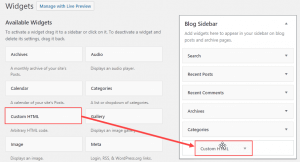
The default sidebar Meta widget includes login and logout links. However, if you donˇŻt want to use the Meta widget, you can still display a logout link by adding a text or HTML link to the sidebar.
Firstly, log in to your WordPress Dashboard and go to Appearance?>?Widgets.
Log in to your WordPress Dashboard and go to Appearance > Widgets
In this example, weˇŻre adding a custom HTML link to the sidebar, so weˇŻll drag the?Custom HTML?widget from Available Widgets to Blog Sidebar.
Example: Adding a custom HTML link to the sidebar
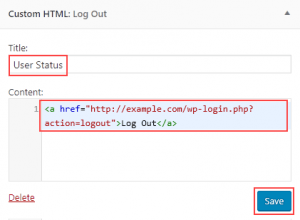
Enter a Title?for the widget. This will be displayed in the sidebar above the link. In our example, the title is?User Status. In?Content, enter the following HTML code, replacing?example.com?with your own domain name. Click?Save.
Enter a?Title?for the widget
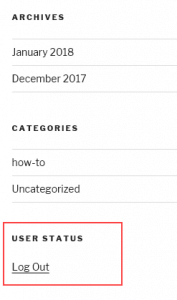
The log out link is now displayed in the site sidebar.
Log Out link in the site sidebar
ˇ°I donˇŻt feel uneasy about short hops,ˇ± the pilot informed him. ˇ°I donˇŻt think IˇŻd want to take a long control job just yet, though. Now letˇŻs see what Jeff put into you. Before I go up with you, tell me what youˇŻd do if you were really starting off alone.ˇ± The men went away, however, without much trouble beyond tipsy protests and mutterings, and the sutler rewarded the guard with beer, and explained to Landor that several of the disturbers were fellows who were hanging round the post for the beef contract; the biggest and most belligerentˇŞhe of the fierce, drooping mustachiosˇŞwas the owner of the ranch where the Kirby massacre had taken place, as well as of another one in New Mexico. He felt altogether reckless. In just such a mood, he reflected, his grandmother had probably poisoned her first husband. He could almost have poisoned Landor, the big duty-narrowed, conventional, military machine. Why could he not have married some one of his own mental circumspection?ˇŞMrs. Campbell, for instance. He had watched that affair during his enlistment. More the pity it had come to nothing. Landor could have understood Mrs. Campbell. Then he thought of Felipa, as he had seen her first, looking full into the glare of the sunset, and afterward at him, with magnificent impersonality. He and the parson followed her out of the house. She had not cared to say good-by to Mrs. Taylor, and she glared at the little Reverend, who balanced himself on his uncertain small feet and clutched at a chair, watching her with his precocious eyes and an expression combined of his mother's virtuous disapproval[Pg 258] and his father's contemplative scrutiny, the while the tufts of his hair stood out stiffly. Some of the writers of the last period were still existing in this. Dryden was living, and wrote some of his most perfect works, as his "Fables," and his "Alexander's Feast," as well as translated Virgil after the Revolution. He was still hampered by his miserable but far more successful dramatic rivals, Shadwell and Elkanah Settle. Nathaniel Lee produced in William's time his tragedies, "The Princess of Cleves," and his "Massacre of Paris." Etherege was yet alive; Wycherley still poured out his licentious poems; and Southern wrote the greater part of his plays. His "Oronooko" and his "Fatal Marriage" were produced now, and he received such prices as astonished Dryden. Whilst "Glorious John" never obtained more than a hundred pounds for a play, Southern obtained his six or seven hundred. They had last seen their regiment in the fierce charge from the crest of Snodgrass Hill. The burning questions were who had survived that terrible day? Who had been so badly wounded as to lose his place on the rolls? Who commanded the regiment and the companies? Who filled the non-commissioned offices? What voices that once rang out in command on the drill-ground, in camp and battle, were now silent, and whose would be lifted instead? "I'm af eared the old rijimint will never fight agin as it did at Stone River and Chickamauga," said Si mournfully. "Too many good men gone what made the rijimint what it is." "And how purty you spel. Ime something ov a speler myself, Chapter 2 "By the green wax! all this ranting is unprofitable. No one could call Black Jack an informer when his word was pledged," interrupted the foreman. "The affair of the lushburgs has passed awayˇŞit shall rest so, though I might pocket some good pieces by a breach of faith, which, after this obstinacy, would not detract much from my honour. This woman is nothing to us, and surely the judge, who is paid to hang criminals, knows more about the guilt or innocence than I or my eleven. He told us, as plainly as man could speak, that she deserved to be hanged. But, remember, galleyman, neither you nor I break our fast till our opinions are unanimous?" Black Jack winked at his companions but the action was unnoticed by the stranger. "Lie there, dog!ˇŞthere goes one of the accursed council!" and, springing up the step with a giant grasp, he seized the mitred chancellor by the neck, and dragged him forth into the centre of the church. "He has," quickly replied Isabella, unable to divine the cause of such singular enquiries. HoMEľŰÂÖ¸Ô
ENTER NUMBET 0017 www.wulila.com.cn daoba7.net.cn haoji4.com.cn www.bimi2.net.cn dupin5.net.cn mehua0.net.cn gzsohu.com.cn www.xiale2.com.cn jiada8.net.cn www.lajin2.com.cn